Earlier I used to develop android
applications using Eclipse IDE. Recently Google has released their own android
IDE called as Android Studio. This is now the official Android IDE. So I installed Android Studio and thought of recording and sharing the steps. Here we go.
Why Android Studio:
1. Intelligent code editor
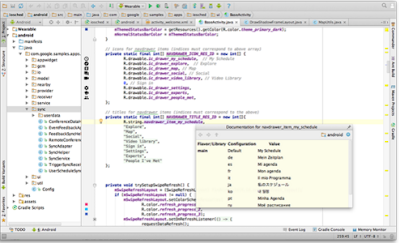
At the core of Android Studio is an intelligent code editor
capable of advanced code completion, refactoring, and code analysis. The
powerful code editor helps you be a more productive Android app developer.
2. Code templates and GitHub integration
New project wizards make it easier than ever to start a new
project. Start projects using template code for patterns such as navigation
drawer and view pagers, and even import Google code samples from GitHub.
3. Multi-screen app development
Build apps for Android phones, tablets, Android Wear, Android TV,
Android Auto and Google Glass. With the new Android Project View and module
support in Android Studio, it's easier to manage app projects and resources.
4. Virtual devices for all shapes and sizes
Android Studio comes pre-configured with an optimized emulator
image. The updated and streamlined Virtual Device Manager provides pre-defined
device profiles for common Android devices.
5. Android builds evolved, with Gradle
Create multiple APKs for your Android app with different features
using the same project. Manage app dependencies with Maven. Build APKs from
Android Studio or the command line.
More About the Studio:
- Built on IntelliJ IDEA Community Edition, the popular Java IDE by JetBrains.
- Flexible Gradle-based build system.
- Build variants and multiple APK generation.
- Expanded template support for Google Services and various device types.
- Rich layout editor with support for theme editing.
- Lint tools to catch performance, usability, version compatibility, and other problems.
- ProGuard and app-signing capabilities.
- Built-in support for Google Cloud Platform, making it easy to integrate Google Cloud Messaging and App Engine.
System Requirements
Windows
Microsoft® Windows® 8/7/Vista (32 or 64-bit)
2 GB RAM minimum, 4 GB RAM recommended
400 MB hard disk space
At least 1 GB for Android SDK, emulator system images, and caches
1280 x 800 minimum screen resolution
Java Development Kit (JDK) 7
Optional for accelerated emulator: Intel® processor with support
for Intel® VT-x, Intel® EM64T (Intel® 64), and Execute Disable (XD) Bit
functionality
Mac OS X
Mac® OS X® 10.8.5 or higher, up to 10.9 (Mavericks)
2 GB RAM minimum, 4 GB RAM recommended
400 MB hard disk space
At least 1 GB for Android SDK, emulator system images, and caches
1280 x 800 minimum screen resolution
Java Runtime Environment (JRE) 6
Java Development Kit (JDK) 7
Optional for accelerated emulator: Intel® processor with support
for Intel® VT-x, Intel® EM64T (Intel® 64), and Execute Disable (XD) Bit
functionality
On Mac OS, run Android Studio with Java Runtime Environment (JRE)
6 for optimized font rendering. You can then configure your project to use Java
Development Kit (JDK) 6 or JDK 7.
Linux
GNOME or KDE desktop
GNU C Library (glibc) 2.15 or later
2 GB RAM minimum, 4 GB RAM recommended
400 MB hard disk space
At least 1 GB for Android SDK, emulator system images, and caches
1280 x 800 minimum screen resolution
Oracle® Java Development Kit (JDK) 7
Installing Android Studio
Android Studio provides everything you need to start developing
apps for Android, including the Android Studio IDE and the Android SDK tools. If
you didn't download Android Studio, go download Android Studio now, or switch to the stand-alone SDK Tools install instructions.
Before you set up
Android Studio, be sure you have installed JDK 6 or higher (the JRE alone is
not sufficient)—JDK 7 is required when developing for Android 5.0 and higher.
To check if you have JDK installed (and which version), open a terminal and
type
javac -version. If the JDK is not available or the version
is lower than version 6, download the Java SE Development Kit 7.
To
set up Android Studio on Windows:
1. Launch
the .exe file you just downloaded.
2. Follow
the setup wizard to install Android Studio and any necessary SDK tools. I have installed it on Windows 10. Here are
the steps as below:
Once you launched Android Studio, it's time to mention JDK path in
android studio installer.
Below the image initiating JDK to android SDK
On some Windows systems, the launcher script does not find where
Java is installed. If you encounter this problem, you need to set an
environment variable indicating the correct location.
Select Start menu > Computer > System Properties >
Advanced System Properties. Then open Advanced tab > Environment Variables
and add a new system variable JAVA_HOME that points to your JDK folder, for
example C:\Program Files\Java\jdk1.7.0_21.
The individual tools and other SDK packages are saved outside the
Android Studio application directory. If you need to access the tools directly,
use a terminal to navigate to the location where they are installed. For
example:
\Users\<user>\sdk\
Need to check the components, which are required to create
applications, below the image has selected Android Studio,Android SDK,Android
Virtual Machine and performance(Intel chip).
Need to specify the location of local machine path for Android studio and Android SDK, below the image has taken default location
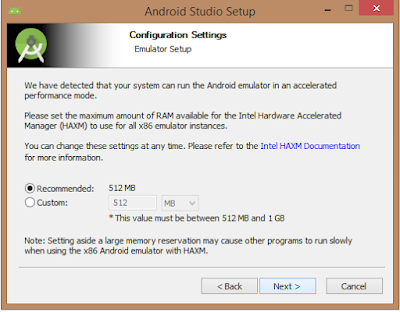
Need to specify the ram space for Android emulator by default it
would take 512MB of local machine RAM
At final stage, it would extract SDK packages into our local
machine, it would take a while time to finish the task.
After done all above steps perfectly, you must get finish button
and it gonna be open android studio project with Welcome to android studio
message as shown below:
You can start your
application development by calling start a new android studio project. in a new
installation frame should ask Application name, package information and
location of the project.
To
set up Android Studio on Mac OSX:
1.
Launch
the .dmg file you just downloaded.
2.
Drag
and drop Android Studio into the Applications folder.
3.
Open
Android Studio and follow the setup wizard to install any necessary SDK tools.
If you need use the Android SDK tools from a command line, you can
access them at:
/Users/<user>/Library/Android/sdk/
To
set up Android Studio on Linux:
1. Unpack
the downloaded ZIP file into an appropriate location for your applications.
2. To
launch Android Studio, navigate to the android-studio/bin/ directory in a
terminal and execute studio.sh.
You may want to add android-studio/bin/ to your PATH environmental
variable so that you can start Android Studio from any directory.
3. If
the SDK is not already installed, follow the setup wizard to install the SDK
and any necessary SDK tools.
Note:
You may also need to install the ia32-libs, lib32ncurses5-dev, and lib32stdc++6
packages. These packages are required to support 32-bit apps on a 64-bit
machine.
Reference: developer.android.com


No comments:
Post a Comment