Friday, January 29, 2016

Program in java to convert a number between any base

One of my friend was looking for a Java program which can convert the given number of any base to any desired base number. So I thought to write a simple program for this.

First create a class "conversion"
public class conversion{
}
Create the main method and get the user inputs using scanner.

public class conversion{

public static void main(String[] args) { System.out.println("Enter the number"); Scanner marut= new Scanner(System.in); String number=marut.nextLine(); System.out.println("Enter the Base of the number"); int fromBase = marut.nextInt(); System.out.println("Enter the Base to convert"); int toBase = marut.nextInt();

} }
In above main method, we get the number with the base which we want to convert.
Number is read in 
String number=marut.nextLine();

And we get the base of this number using 
int fromBase = marut.nextInt();

As this will be a whole number, we consider it as integer.

Similarly we get the base to which this number has to be converted to using
int toBase = marut.nextInt();

Now create another method called as "convertFromBaseToBase" which actually converts the number.

public static String convertFromBaseToBase(String str, int fromBase, int toBase){ //Convert from one base to other return Integer.toString(Integer.parseInt(str, fromBase), toBase); } 
This method the number to be converted from base and to base as the arguments and returns the converted value in string.
Below is the code which does the trick:

Integer.toString(Integer.parseInt(str, fromBase), toBase)


Now in the main method we call this method to get the converted value and then print the result

String result=convertFromBaseToBase(number,fromBase,toBase);
System.out.println("Converted value is: "+result);
the whole program looks like this:

package com.chapter2; import java.util.Scanner; public class conversion { /** * @param args */ public static void main(String[] args) { System.out.println("Enter the number"); Scanner marut= new Scanner(System.in); String number=marut.nextLine(); System.out.println("Enter the Base of the number"); int fromBase = marut.nextInt(); System.out.println("Enter the Base to convert"); int toBase = marut.nextInt(); String result=convertFromBaseToBase(number,fromBase,toBase); System.out.println("Converted value is: "+result); } public static String convertFromBaseToBase(String str, int fromBase, int toBase){ //convert from one base to another return Integer.toString(Integer.parseInt(str, fromBase), toBase); } }
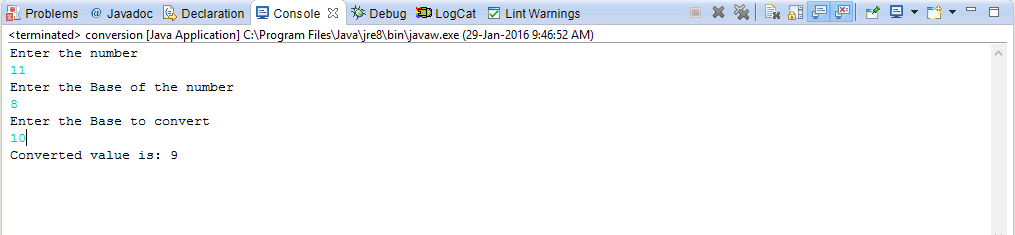
You can run this program and the result is as shown below:


That's it. You can download this program here


Thursday, January 28, 2016

Creating REST API to generate the OTP -part 2

In continuation with my previous blog Creating-Rest-API-to-generate-otp-part-1, this blog covers the rest of the procedure to generate the OTP.

Now we have all the core logic ready. Let’s create an endpoint to register the user. In your project’s root directory, create a file named request_sms.php.

In this Code 


  1. We receive the name, email and mobile number from the registration form of the web or device as a POST parameters.
  2. We add this in "Users" table by calling createUser() function. Initially the user status will be set to 0 which indicate the user is inactive. This status will be made to 1 when the user verifies the OTP
  3. Once the user row is created, we request for an SMS to the mobile number sent from the web by calling sendSms() method
  4. sendSms() methos will connect to this RESR API to send SMS with a 6 digits OTP to the users mobile number

Below is the sample SMS message the user will receive to their mobile. The OTP should be prefixed by :and space in the message.

"Welcome to Tech Thoughts. Your OTP is : 217798"


<?php
include './include/DbHandler.php';
$db = new DbHandler();
$response = array();
if (isset($_POST['mobile']) && $_POST['mobile'] != '') {
    $name = $_POST['name'];
    $email = $_POST['email'];
    $mobile = $_POST['mobile'];
    $otp = rand(100000, 999999);
    $res = $db->createUser($name, $email, $mobile, $otp);
    if ($res == USER_CREATED_SUCCESSFULLY) {
         
        // send sms
        sendSms($mobile, $otp);
         
        $response["error"] = false;
        $response["message"] = "SMS request is initiated! You will be receiving it shortly.";
    } else if ($res == USER_CREATE_FAILED) {
        $response["error"] = true;
        $response["message"] = "Sorry! Error occurred in registration.";
    } else if ($res == USER_ALREADY_EXISTED) {
        $response["error"] = true;
        $response["message"] = "Mobile number already existed!";
    }
} else {
    $response["error"] = true;
    $response["message"] = "Sorry! mobile number is not valid or missing.";
}
echo json_encode($response);
function sendSms($mobile, $otp) {
     
    $otp_prefix = ':';
    //Your message to send, Add URL encoding here.
    $message = urlencode("Welcome to Tech Thoughts. Your OTP is '$otp_prefix $otp'");
    $response_type = 'json';
    //Define route
    $route = "4";
     
    //Prepare you post parameters
    $postData = array(
        'authkey' => MSG91_AUTH_KEY,
        'mobiles' => $mobile,
        'message' => $message,
        'sender' => MSG91_SENDER_ID,
        'route' => $route,
        'response' => $response_type
    );
//API URL
// init the resource
    $ch = curl_init();
    curl_setopt_array($ch, array(
        CURLOPT_URL => $url,
        CURLOPT_RETURNTRANSFER => true,
        CURLOPT_POST => true,
        CURLOPT_POSTFIELDS => $postData
            //,CURLOPT_FOLLOWLOCATION => true
    ));
    //Ignore SSL certificate verification
    curl_setopt($ch, CURLOPT_SSL_VERIFYHOST, 0);
    curl_setopt($ch, CURLOPT_SSL_VERIFYPEER, 0);
    //get response
    $output = curl_exec($ch);
    //Print error if any
    if (curl_errno($ch)) {
        echo 'error:' . curl_error($ch);
    }
    curl_close($ch);
}
?>
Now we need to create another endpoint to verify the OTP. Create a php file named verify_otp.phpwith below content.
In the below code
1.     The OTP will be received from the device or website  as a POST parameter
2.     The user who matches with OTP will fetched from the users table.
3.     Then the user status will be set to 1 in both users and sms_codes table which makes the user active.
4.     The above two steps are implemented in activateUser() function.
<?php
include './include/DbHandler.php';
$db = new DbHandler();
$response = array();
$response["error"] = false;
if (isset($_POST['otp']) && $_POST['otp'] != '') {
    $otp = $_POST['otp'];
    $user = $db->activateUser($otp);
    if ($user != NULL) {
        $response["message"] = "User created successfully!";
        $response["profile"] = $user;
    } else {
        $response["message"] = "Sorry! Failed to create your account.";
    }
     
     
} else {
    $response["message"] = "Sorry! OTP is missing.";
}
echo json_encode($response);
?>
Now You can test this REST API using Postman a chrome extension or use your own PHP pages.
You can download this code  where I have created two files to test this API i,e index.php where it takes name, email and Mobile number and then executes request_sms.php. And another file which takes this OTP as input and verifies this. i.e executes verify_otp.php

Request SMS
URL
Method
Parameters
Description
http://localhost/android_sms/request_sms.php
POST
name, email, mobile
Request SMS


The below json should be produced when SMS sent successfully.
{
    "error": false,
    "message": "SMS request is initiated! You will be receiving it shortly."
}
Verifying user OTP
URL
Method
Parameters
Description
http://localhost/android_sms/verify_otp.php
POST
otp
verifying user verification code


When the OTP is verified successfully, the complete user profile information should be produced in the json.
{
    "error": false,
    "message": "User created successfully!",
    "profile": {
        "name": "G T Karjol",
        "email": "karjol@gmail.com",
        "mobile": "0000000000",
        "apikey": "4a6ed225209632e5467b237c6b00d310",
        "status": 0,
        "created_at": "2016-01-27 15:12:22"
    }
}
You can download the full source code here
That's it. Happy Coding.