In Android, you can set custom fonts on TextView controls to support different languages or to change UI typography. When I added Kannada language support to a Panchanga application (SRSM Mantralaya), this approach worked well: you need a font file (usually a .ttf) and then you load it and apply it to your TextView.
Where to put the font file
Place your font file in the app's assets folder. The original post used an assets/font folder; common conventions are assets/font/ or assets/fonts/. For the examples below I use assets/font/MyFont.ttf.
Note: For modern Android apps consider using res/font/ with Fonts in XML (API 26+) or the AndroidX support libraries. Those approaches allow you to set fonts directly in XML and support downloadable fonts.
Basic steps
Put the font file (MyFont.ttf) in assets/font/.
Get a reference to the TextView in Java.
Create a Typeface from the asset using Typeface.createFromAsset().
Apply it with setTypeface().
Example — layout XML
<!-- res/layout/activity_main.xml -->
<LinearLayout xmlns:android="http://schemas.android.com/apk/res/android"
    android:layout_width="match_parent"
    android:layout_height="match_parent"
    android:orientation="vertical"
    android:padding="16dp">

    <TextView
        android:id="@+id/textview1"
        android:layout_width="wrap_content"
        android:layout_height="wrap_content"
        android:text="Sample text in custom font" />

</LinearLayout>
Example — Activity Java code
// in your Activity
TextView text = (TextView) findViewById(R.id.textview1);
Typeface tf = Typeface.createFromAsset(getAssets(), "font/MyFont.ttf");
text.setTypeface(tf);
(From the original: TextView text = (TextView)findViewById(R.id.textview1);)
Alternative: caching Typeface (recommended)
Creating a Typeface from assets is moderately expensive. Cache typefaces to avoid repeated loads (e.g., when many views use the same font):
public class FontCache {
    private static final HashMap<String, Typeface> cache = new HashMap<>();

    public static Typeface getTypeface(Context ctx, String name) {
        Typeface tf = cache.get(name);
        if (tf == null) {
            try {
                tf = Typeface.createFromAsset(ctx.getAssets(), "font/" + name);
            } catch (Exception e) {
                return null;
            }
            cache.put(name, tf);
        }
        return tf;
    }
}

// usage:
text.setTypeface(FontCache.getTypeface(this, "MyFont.ttf"));
The original images
(These are the original images from the post; add alt text if your platform allows.)
Modern alternatives (recommended for new apps)
Fonts in XML (res/font/) — supported natively on API 26+. Allows setting fontFamily in XML. Preferable for consistent theming and easier use in styles.
AndroidX Core library (or Support Library) backport for Fonts in XML — lets you use fonts on older Android versions.
Downloadable Fonts — reduces APK size; useful if using Google Fonts.
As I told you in my previous blog I was working on designing of a website for an Ashrama. They wanted a background music to play in the home page of the website. I was wondering how to do it as it has to play without any controls and should start automatically. It’s pretty simple to do it.
Overview
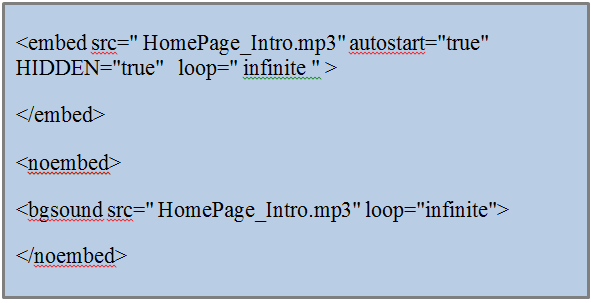
HomePage_Intro.mp3 is the file which is going to play in the background. You can replace it with your file name and also note that this should be available on the server. If it’s not there in the directory where the index file is, you can give the full path (or URL) of the music file.
Below I keep the original examples (for older browsers) and add a modern HTML5 recommendation and practical notes about browser behavior, accessibility and hosting.
Modern (recommended) approach — HTML5
Use the HTML5
<!-- HTML5 audio: will loop and attempt to autoplay. Many browsers block autoplay with sound. -->
<audio src="HomePage_Intro.mp3" autoplay loop></audio>
Notes:
Most modern browsers block autoplay with sound unless the audio is muted or the user has previously interacted with the page. To increase the chance of autoplay you can use muted autoplay, but that obviously mutes the audio:
Important: newer IE versions may recognize both methods and could play audio twice if you include multiple tags without a conditional wrapper. Putting the bgsound inside a noembed (or using conditional comments or feature detection) prevents duplicate play.
Show controls (if you want the user to control playback)
In the original article I hid the music controls. If you want to show the controls, use the HTML5 controls attribute:
Or provide a simple link that visitors can click to start the music (this is the least intrusive option):
<a href="HomePage_Intro.mp3">Play music</a>
Images from the original article
Browser compatibility and autoplay behavior
Modern browsers (Chrome, Firefox, Safari, Edge) implement autoplay policies that generally block autoplay with sound until the user interacts with the page. Autoplay with sound may be allowed only under specific conditions (user media engagement index, previously granted permission, or muted audio).
Mobile browsers commonly block autoplay with sound to avoid unexpected data usage and user annoyance.
Therefore, do not rely on autoplay to always work. Provide a user-controlled play button or link.
Practical recommendations (technical)
Provide multiple audio formats where possible (MP3 for broad support, OGG for some older browsers) so you can do format fallbacks server-side or via elements.
<audio controls>
  <source src="HomePage_Intro.ogg" type="audio/ogg">
  <source src="HomePage_Intro.mp3" type="audio/mpeg">
  Your browser does not support the audio element.
</audio>
Optimize audio file size (bitrate/compression) to reduce page load. Consider hosting on a CDN or streaming service if the file is large or has high traffic.
Consider feature detection with JavaScript to progressively enhance behavior (try to autoplay, then fall back to showing a play button if blocked).
Accessibility and UX
Don’t surprise your visitors. Auto-playing audio can be disruptive and cause people to leave the page quickly. Provide controls or a clear "Play music" link.
Provide a transcript or caption if the audio contains important information.
Use ARIA labels if you have custom player controls, e.g. role="button" aria-pressed="false" on play/pause toggles.
Hosting and legal
Ensure the audio file is correctly hosted and accessible (CORS may matter for cross-origin requests). Use absolute or relative URLs as appropriate.
Confirm you have the right to distribute the music (copyright/royalty/licensing).
Conclusion
We should be aware that background music that automatically starts playing when a web page is loaded may not be appreciated by a large number of the visitors. Some of them, when greeted with the sudden blaring of music from their speakers, may immediately hit the BACK button of their browsers.
You need to remember that there are people who browse the Internet in public libraries, surfing centres, at work, or in the dead of the night when others are asleep. Others may already have their favourite music playing on their computer speakers, and your auto-playing music file will only cause them to be annoyed. So it’s always better to give the controls for the players.
Even if you are satisfied that your website has the type of target audience that will enjoy your background music, there are alternatives to automatically playing music that you might want to consider. For example, giving visitors a link which they can click to play music would allow you to showcase your music while remaining sensitive to your visitors' preferences.
After clicking on the “Play music” link, the music can start playing in the background or even you can give the controls for the player to control the music.
I was designing a website for an ashrama. They wanted the header to be displayed in Sanskrit. So I was looking for a solution and solved it with the below solution. This may be helpful to you so thought of sharing it. This is not only for Sanskrit font but for any customized font you can use this technique.
Why upload a font to your server?
If we design a website using a font that only exists locally on your computer, visitors won't see that font unless they also have the same font installed locally. To make a custom font appear for all visitors, upload the font file(s) to your web server and define the font in your CSS using @font-face.
It is assumed that you have permission to use the fonts from the font creator and that you have permission to upload files to the server. We need to have the permissions for the font before using them on a public website. Otherwise you can create your own fonts using the FontForge or any other typesetting software.
Supported formats and browser compatibility (quick note)
Modern practice: include WOFF and WOFF2 for best compression and browser support. Keep TTF for some older browsers and EOT for very old IE (IE8 and below). The original article demonstrates TTF and EOT — those examples are kept below, but a modern pattern is also provided.
Steps to upload and use a custom font
Download the new font file and save it locally. If the file is compressed, extract it.
The extracted files commonly include .ttf (TrueType) or .eot (Embedded OpenType). Consider generating .woff and .woff2 for modern browsers.
If you don't have an .eot file and need legacy IE8 support, you can convert .ttf to .eot. (You can use tools such as FontForge linked above.)
Upload the font files to a folder on your website, e.g. /fonts/. If you plan to use multiple custom fonts, create a fonts folder for organization.
Open your site's CSS and add @font-face declarations for each font you uploaded.
Original example from the article (kept as the author provided)
When we start to develop any commercial android application, we may need to develop a trial application which runs on the user's device for a specific time and forces the user to buy the application to use it further.
Below are three techniques you can use to implement a time-limited trial in an Android app, with pros and cons for each.
1) Save first-run timestamp locally (easiest)
When the user runs the application for the first time, save the current date and time to SharedPreferences, a file, or the app database. Every time the app starts, compare the current date/time with the saved first-run timestamp to determine whether the trial period has expired. If it has, call finish() or otherwise prevent further use.
Pros:
Very easy to implement.
Cons:
Easily broken by uninstalling and reinstalling the app (which clears the app data), or by manipulating the device clock.
2) Hard-coded end date (simple, but flawed)
Hard-code a single end date for the trial in the application. All users stop being able to use the trial after that date.
Pros:
Easy to implement.
Cons:
Can be bypassed by changing the device date/time.
All users share the same end date (not individualized).
3) Server-validated device registration (recommended, most robust)
This approach requires a server and a database. Whenever the app starts, the device sends a unique device identifier to your server. The server checks whether there is already an entry for that device; if not, it creates one with the current date/time as the trial start. On each app start the server evaluates whether the trial period has expired and communicates the result back to the app.
Notes and links:
To obtain a device identifier you can refer to TelephonyManager.getDeviceId():
Much harder for users to bypass (uninstall/reinstall and device clock changes do not reset server records).
Cons:
Requires extra infrastructure (server + database) and careful handling of identifiers and privacy.
Where to do the check in your app
Do the trial expiration check in the onCreate() of your main Activity. If the trial has expired, show an AlertDialog that points the user to the full/commercial version on Google Play and then call finish() when the user confirms.
Example flow (high level, keep this as guidance rather than exact code):
App starts -> collect device identifier -> POST to server endpoint -> server replies {"expired":true/false} -> if expired show dialog and call finish().
Security and privacy considerations (brief)
Be careful with device identifiers and permissions. Some identifier APIs require runtime permissions or are deprecated on newer Android releases; review current Android docs before choosing an identifier.
Document how you store and use device identifiers in your privacy policy.
Closing
Third approach is the most robust and is the recommended way to implement a trial application that cannot be easily broken. It requires more effort (server + database) but provides the best protection for commercial apps.