In my last articles i.e creating-rest-api-to-generate-otp-part-2 and creating-rest-api-to-generate-otp-part-1 you have learnt how to create the REST API to generate the OTP and get it verified through the website.
Now we will create an android app for which registration process is going to use this REST API to get the user registered.
In this guide I use the Volley library to make HTTP requests. We will discuss more about this Volley library in another article. Also, before going through this article you need to have basic knowledge about Android Services, BroadcastReceivers and IntentService:
- https://developer.android.com/guide/components/services.html
- https://developer.android.com/reference/android/content/BroadcastReceiver.html
- https://developer.android.com/training/run-background-service/create-service.html
This Part I covers project setup and the core helper classes. We will use a BroadcastReceiver to read the SMS whenever the device receives the OTP and an IntentService to execute the HTTP request that sends the received OTP back to the server for verification.
TL;DR
- Build an Android app that requests an OTP from your REST API.
- Your server should send an SMS containing a single, unique delimiter and the OTP (example: "SWNAND:1234").
- App's BroadcastReceiver detects incoming SMS, extracts the OTP, and starts an IntentService to call the verification endpoint.
- The app uses Volley for network calls and SharedPreferences (PrefManager) to store state.
Prerequisites
- Android Studio (recommend recent stable version).
- Minimum SDK: depends on your project; the article code assumes older support libs — consider migrating to AndroidX for modern projects.
- Basic familiarity with Services, BroadcastReceiver, IntentService, and Gradle.
Permissions and Play Store considerations (important)
- This tutorial reads SMS messages. On Android 6+ you must request runtime permissions (RECEIVESMS, READSMS) from the user.
- Google Play has restrictions on apps requesting SMS permissions. For production apps consider using the SMS Retriever API (which doesn't require SMS read permissions) or carefully read Play Store policy and provide a strong justification for SMS permissions.
- In this article we show the code and manifest entries used in the sample. If you publish your app to Play Store, confirm the current policy and consider alternatives.
Project setup (Android Studio)
- In Android Studio, create a new project via File ⇒ New Project and choose Blank Activity when prompted.


- Press Finish to create the project. This creates the Android project (SMSVerify).
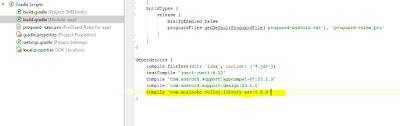
3. Add Volley dependency
Open build.gradle (Module: app) and add the Volley dependency. The original article used 'com.mcxiaoke.volley:library-aar:1.0.0'. For modern projects, prefer the official artifact. Example:
// official Volley (example version)
implementation 'com.android.volley:volley:1.2.1'

// legacy: 'com.mcxiaoke.volley:library-aar:1.0.0' (older/unofficial)
(Choose the appropriate dependency for your project. If you remain on old support libraries, the legacy artifact may continue to work.)
4. Add string resources
Open res/values/strings.xml and add the following values:
<?xml version="1.0" encoding="utf-8"?>
<resources>
<string name="app_name">SMSVerify</string>
<string name="action_settings">Settings</string>
<string name="title_activity_sms">SMSVerify</string>
<string name="action_logout">Logout</string>
<string name="msg_enter_mobile">Enter your mobile number to get started!</string>
<string name="lbl_name">Name</string>
<string name="lbl_email">Email</string>
<string name="lbl_mobile">Mobile</string>
<string name="lbl_next">NEXT</string>
<string name="msg_sit_back">Sit back & Relax! while we verify your mobile number</string>
<string name="msg_manual_otp">(Enter the OTP below in case if we fail to detect the SMS automatically)</string>
<string name="lbl_enter_otp">Enter OTP</string>
<string name="lbl_submit">SUBMIT</string>
</resources>
5. Add color resources
Open res/values/colors.xml and add:
<?xml version="1.0" encoding="utf-8"?>
<resources>
    <color name="colorPrimary">#3F51B5</color>
    <color name="colorPrimaryDark">#303F9F</color>
    <color name="colorAccent">#FF4081</color>
    <color name="textColorPrimary">#FFFFFF</color>
    <color name="windowBackground">#FFFFFF</color>
    <color name="navigationBarColor">#000000</color>
    <color name="bg_view_sms">#ffd423</color>
    <color name="bg_view_otp">#fc6d38</color>
</resources>
6. Styles (base and v21)
Open res/values/styles.xml and add:
<resources>
    <style name="MyMaterialTheme" parent="MyMaterialTheme.Base">
    </style>

    <style name="MyMaterialTheme.Base" parent="Theme.AppCompat.Light.DarkActionBar">
        <item name="windowNoTitle">true</item>
        <item name="windowActionBar">false</item>
        <item name="colorPrimary">@color/colorPrimary</item>
        <item name="colorPrimaryDark">@color/colorPrimaryDark</item>
        <item name="colorAccent">@color/colorAccent</item>
    </style>
</resources>
Create res/values-v21/styles.xml and add (shared-element transition properties):
<resources>
    <style name="MyMaterialTheme" parent="MyMaterialTheme.Base">
        <item name="android:windowContentTransitions">true</item>
        <item name="android:windowAllowEnterTransitionOverlap">true</item>
        <item name="android:windowAllowReturnTransitionOverlap">true</item>
        <item name="android:windowSharedElementEnterTransition">@android:transition/move</item>
        <item name="android:windowSharedElementExitTransition">@android:transition/move</item>
    </style>
</resources>
7. Set the app theme in AndroidManifest.xml
Open AndroidManifest.xml and set the theme on the
<manifest xmlns:android="http://schemas.android.com/apk/res/android" package="marutsoft.com.smsverify">

    <application android:allowBackup="true" android:icon="@mipmap/ic_launcher"
                 android:label="@string/app_name" android:supportsRtl="true"
                 android:theme="@style/MyMaterialTheme">
        ...
    </application>

</manifest>
8. Project packages
Create five packages to organize the project:
- activity
- app
- helper
- receiver
- service
9. Config.java (app configuration)
Under the app package create Config.java. It contains app configuration and server endpoints.
/**
 * Created by Karjol G T on 01-02-2016.
 */

public class Config {

    // server URL configuration
    public static final String URL_REQUEST_SMS = "http://192.168.0.3/OTP_SMS/request_sms.php";
    public static final String URL_VERIFY_OTP =  "http://192.168.0.3/OTP_SMS/verify_otp.php";

    public static final String SMS_ORIGIN = "SWNAND";

    // special character to prefix the otp. Make sure this character appears only once in the sms
    public static final String OTP_DELIMITER = ":";
}
Note: replace the hard-coded 192.168.0.3 with your server hostname or an environment/config placeholder, for example:
public static final String URL_REQUEST_SMS = "http://<SERVER_IP>/OTP_SMS/request_sms.php";
10. MyApplication.java (Volley init)
Under the app package create MyApplication.java. This class initializes Volley core objects and provides a shared RequestQueue.
package marutsoft.com.smsverify.app;

import android.app.Application;
import android.text.TextUtils;
import com.android.volley.Request;
import com.android.volley.RequestQueue;
import com.android.volley.toolbox.Volley;

/**
 * Created by Karjol G T on 01-02-2016.
 */

public class MyApplication extends Application {
    public static final String TAG = MyApplication.class.getSimpleName();

    private RequestQueue mRequestQueue;

    private static MyApplication mInstance;

    @Override
    public void onCreate() {
        super.onCreate();
        mInstance = this;
    }

    public static synchronized MyApplication getInstance() {
        return mInstance;
    }

    public RequestQueue getRequestQueue() {
        if (mRequestQueue == null) {
            mRequestQueue = Volley.newRequestQueue(getApplicationContext());
        }
        return mRequestQueue;
    }

    public <T> void addToRequestQueue(Request<T> req, String tag) {
        req.setTag(TextUtils.isEmpty(tag) ? TAG : tag);
        getRequestQueue().add(req);
    }

    public <T> void addToRequestQueue(Request<T> req) {
        req.setTag(TAG);
        getRequestQueue().add(req);
    }

    public void cancelPendingRequests(Object tag) {
        if (mRequestQueue != null) {
            mRequestQueue.cancelAll(tag);
        }
    }
}
Add MyApplication to AndroidManifest.xml by setting the application name if you want the class to be used automatically:
<application
    android:name="marutsoft.com.smsverify.app.MyApplication"
    android:allowBackup="true"
    android:icon="@mipmap/ic_launcher"
    android:label="@string/app_name"
    android:supportsRtl="true"
    android:theme="@style/MyMaterialTheme">

    <!-- Activities, receivers, services go here -->

</application>
11. Custom ViewPager (disable swipe)
Under helper package create MyViewPager.java (a custom ViewPager that disables swipe):
package marutsoft.com.smsverify.helper;

import android.content.Context;
import android.support.v4.view.ViewPager;
import android.util.AttributeSet;
import android.view.MotionEvent;

/**
 * Created by Karjol G T on 01-02-2016.
 */
public class MyViewPager extends ViewPager {

    public MyViewPager(Context context) {
        super(context);
    }

    public MyViewPager(Context context, AttributeSet attrs) {
        super(context, attrs);
    }

    @Override
    public boolean onInterceptTouchEvent(MotionEvent event) {
        // Never allow swiping to switch between pages
        return false;
    }

    @Override
    public boolean onTouchEvent(MotionEvent event) {
        // Never allow swiping to switch between pages
        return false;
    }
}
If your project uses AndroidX, update imports to androidx.viewpager.widget.ViewPager.
12. PrefManager.java (SharedPreferences helper)
Under helper package create PrefManager.java. This class stores user information in SharedPreferences.
package marutsoft.com.smsverify.helper;

import android.content.Context;
import android.content.SharedPreferences;
import android.content.SharedPreferences.Editor;

import java.util.HashMap;

/**
 * Created by Karjol G T on 01-02-2016.
 */

public class PrefManager {

    SharedPreferences pref;
    Editor editor;
    Context _context;

    // Shared pref mode
    int PRIVATE_MODE = 0;

    // Shared preferences file name
    private static final String PREF_NAME = "AndroidHive";

    // All Shared Preferences Keys
    private static final String KEY_IS_WAITING_FOR_SMS = "IsWaitingForSms";
    private static final String KEY_MOBILE_NUMBER = "mobile_number";
    private static final String KEY_IS_LOGGED_IN = "isLoggedIn";
    private static final String KEY_NAME = "name";
    private static final String KEY_EMAIL = "email";
    private static final String KEY_MOBILE = "mobile";

    public PrefManager(Context context) {
        this._context = context;
        pref = _context.getSharedPreferences(PREF_NAME, PRIVATE_MODE);
        editor = pref.edit();
    }

    public void setIsWaitingForSms(boolean isWaiting) {
        editor.putBoolean(KEY_IS_WAITING_FOR_SMS, isWaiting);
        editor.commit();
    }

    public boolean isWaitingForSms() {
        return pref.getBoolean(KEY_IS_WAITING_FOR_SMS, false);
    }

    public void setMobileNumber(String mobileNumber) {
        editor.putString(KEY_MOBILE_NUMBER, mobileNumber);
        editor.commit();
    }

    public String getMobileNumber() {
        return pref.getString(KEY_MOBILE_NUMBER, null);
    }

    public void createLogin(String name, String email, String mobile) {
        editor.putString(KEY_NAME, name);
        editor.putString(KEY_EMAIL, email);
        editor.putString(KEY_MOBILE, mobile);
        editor.putBoolean(KEY_IS_LOGGED_IN, true);
        editor.commit();
    }

    public boolean isLoggedIn() {
        return pref.getBoolean(KEY_IS_LOGGED_IN, false);
    }

    public void clearSession() {
        editor.clear();
        editor.commit();
    }

    public HashMap<String, String> getUserDetails() {
        HashMap<String, String> profile = new HashMap<>();
        profile.put("name", pref.getString(KEY_NAME, null));
        profile.put("email", pref.getString(KEY_EMAIL, null));
        profile.put("mobile", pref.getString(KEY_MOBILE, null));
        return profile;
    }
}
13. What’s next / Part II
The remaining part (reading SMS via BroadcastReceiver, starting the IntentService, HTTP verification flow, and UI wiring) will continue in Part II of this blog. In Part II I will include the receiver and service implementation and a demo of the complete verification flow.
Troubleshooting / Notes
- If Gradle sync fails, verify your dependency versions and Android support vs AndroidX alignment.
- If OTP is not detected, check SMS format on the server and confirm the delimiter and origin are present as configured in Config.java.
- On Android 6+ ensure runtime permissions are requested and granted. If using the SMS Retriever API it avoids SMS read permissions.
The Remaining part, we will continue in next Part II of this blog.
No comments:
Post a Comment